Dashboard filters
For each dashboard page, you can configure a set of filters that apply to all widgets on that page. These are known as Page level filters.
Creating dashboard filters
Do the following to add page level or dashboard level filters:
-
From a workspace, access a dashboard.
-
On the dashboard, from the upper right corner, click the Settings icon and then choose Manage filters.
-
In the Manage Filters box, click New filter.
-
In the New Filter box, specify the following details.
- Default values: Choose a workbook and then select the filter column you want to add.
- Select workbook
- Filter column
- Value
- Applicable to: Control where your filter is applied to fine-tune your dashboard. Choose whether this filter should apply to some widgets but not others. By default, it applies to all widgets on the dashboard.
- Link filters: Choose a filter from one workbook to filter widgets across multiple workbooks. If the same column exists in different workbooks on the dashboard, you can unify them here. For example, linking a "Date" column across two workbooks will result in a single date filter on the dashboard that works for widgets from both workbooks.
- Default values: Choose a workbook and then select the filter column you want to add.
-
Click Apply.
Types of dashboard filters
Similar to the Widget filters, there are options for page filters, which can be applied to three main types of columns:
Dimension (Text columns)
- Description: Categorical or textual columns (e.g., Payment Type, Country).
- How it works: If a text column is configured as a Single Select data type in your workbooks, it will appear as a list of options that you can select as filter.
Metric (Numeric columns)
- Description: Columns containing numerical data (e.g., Sales Amount, Quantity).
- Available filter operations:
- Greater than
- Less than
- Between
- Equal to
- Not equal to
- Example: Show only records where "Total Sales" is greater than 1,000.
Date column
- Description: Columns containing date or time values.
- Available filter options:
- Custom date range: Manually select start and end dates on the calendar.
- Rolling date ranges: Predefined options like Today, This Week, Last Month, Year to Date, etc.
- Dynamic date ranges: Last N days/weeks/months/quarters/years, Next N days/weeks/months, etc.
- Time buckets: Filter by Month of Year, Day of Week, Quarter of Year, Week of Year, etc.
- Example: Show data for "Last 30 Days" or "This Quarter".
Dependent filters
By default, page-level filters operate with a dependency hierarchy. Consider a scenario with "Country," "State," and "City" filters. With this dependency structure, upon selecting a specific country in the first filter, the subsequent "State" filter will dynamically display only the states within that chosen country. Similarly, upon selecting a particular state, the "City" filter will then present only the cities located within that selected state in its drop-down menu. When using single-select drop-down filters, the available options in the subsequent filters will dynamically update based on the selection made in the preceding filter.
When a user selects an option in a single-select drop-down filter, the system automatically filters the data and updates the available options in any subsequent single-select drop-down filters that are dependent on the initial selection. This ensures that users only see options that are valid within the context of their current filter choices.
For example, a dashboard exists with filters for Date Range, Hotel Code, and Payment Type.
-
You first select a Date Range (e.g., "Last Month").
-
The Hotel Code filter then only shows hotel codes that had transactions within that last month.
-
Finally, if you select a specific Hotel Code, the Payment Type filter will only display payment types used at that particular hotel during the last month.
In this case, Hotel Code and Payment Type are dependent filters because their available options change based on the selection in the primary Date Range filter.
Another example:
If the filters are ordered as:
- Country
- State
- City
-
The Country filter dropdown will show all available countries.
-
If you select United States of America, the State filter will automatically update to show only states within the USA (e.g., NC, NJ, CA, FL, AZ, TX).
-
If you then select NC, the City filter will update to display only cities within that state (e.g., Charlotte, Raleigh).
This enhancement presents the following benefits:
-
Improved data exploration: You will only see relevant filter options based on their current selections, making it easier to narrow down data and identify key insights.
-
Reduced confusion: Eliminates the display of irrelevant or invalid filter combinations, preventing user confusion and potential errors.
-
Streamlined workflow: Simplifies the filtering process by guiding users through logical selection steps.
-
Cleaner interface: Presents a more organized and contextually aware filtering panel.
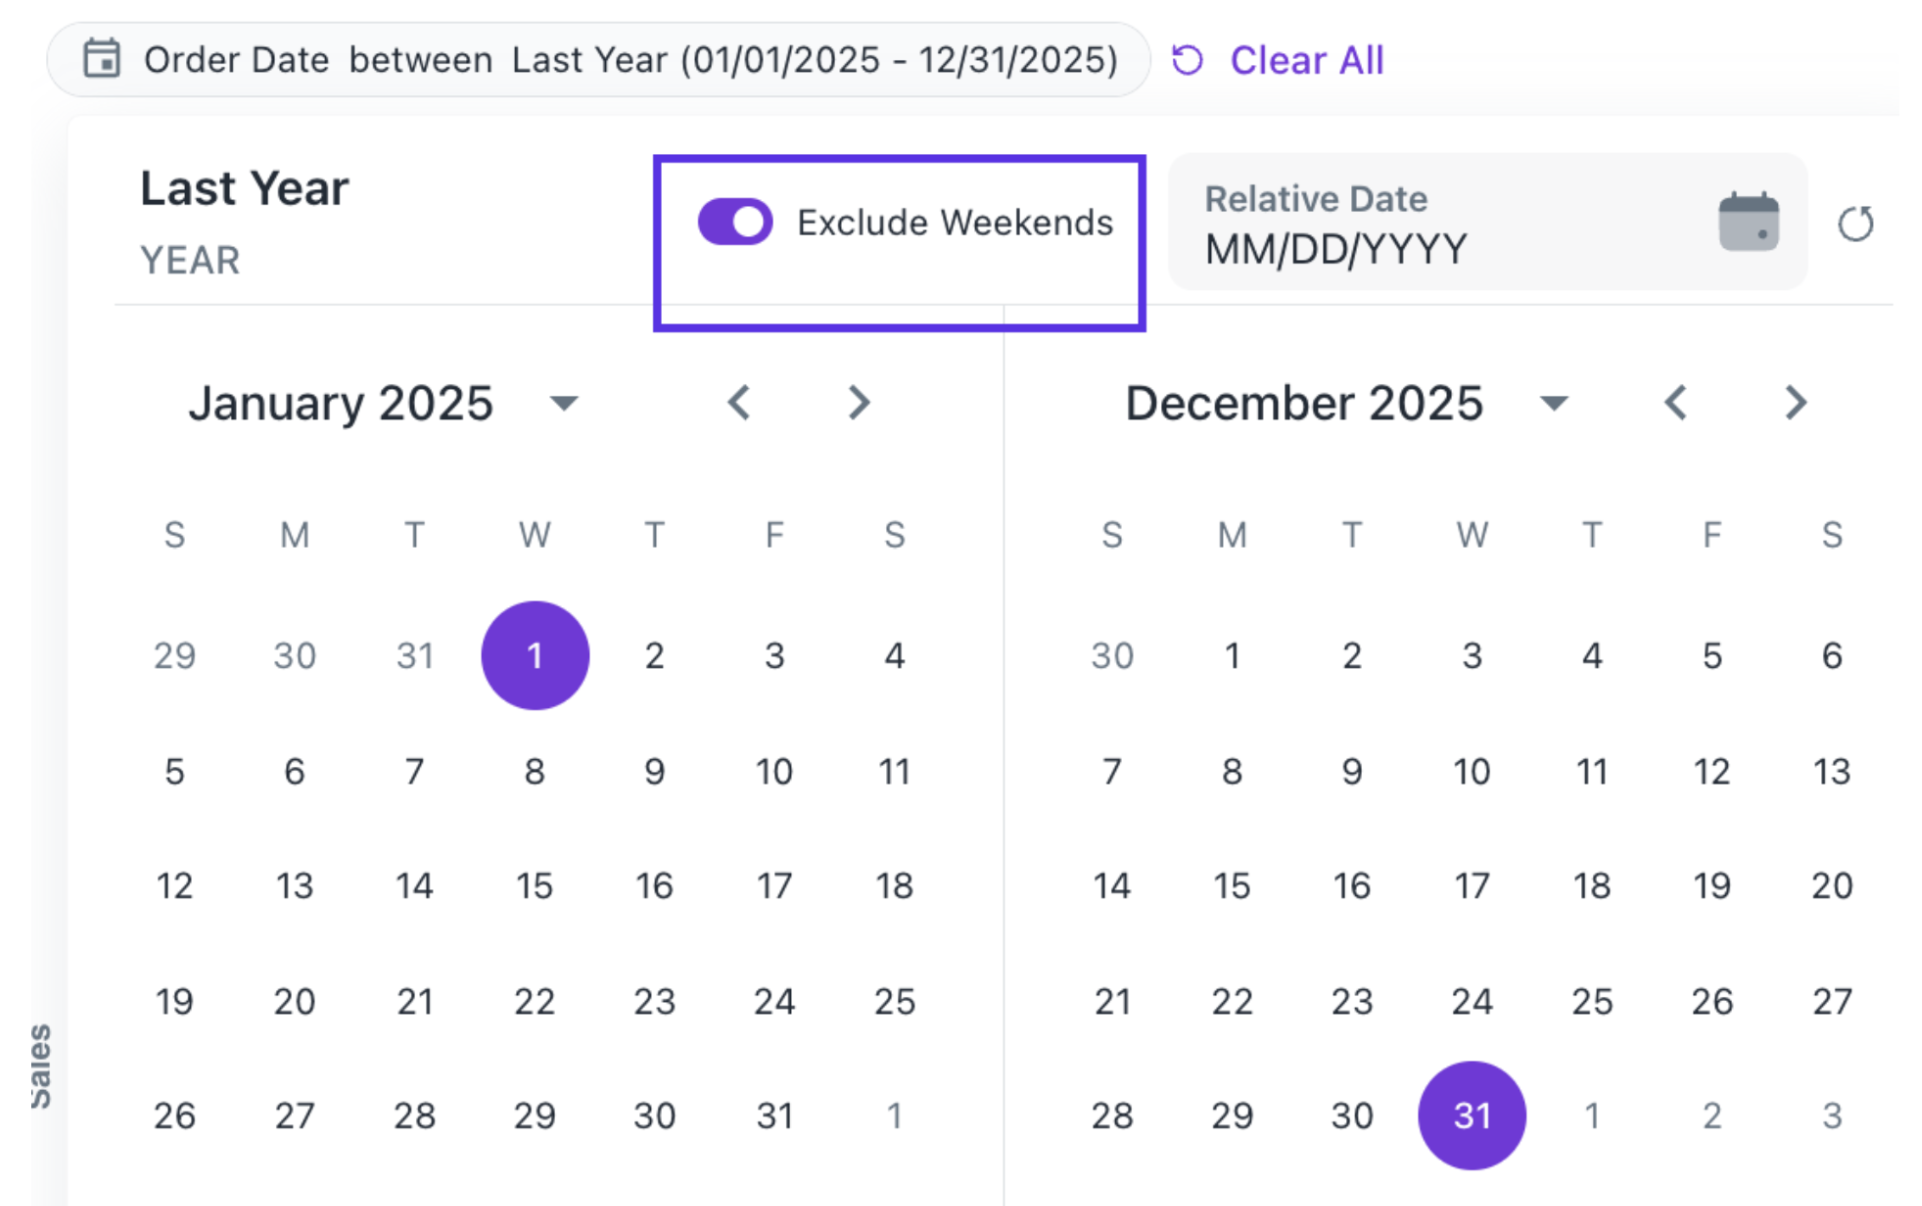
Page-Level Filter: Exclude Weekends
A new page-level date filter lets you exclude weekends (Saturday and Sunday) from visualizations with a single toggle. Ideal for business metrics where weekend data creates noise.
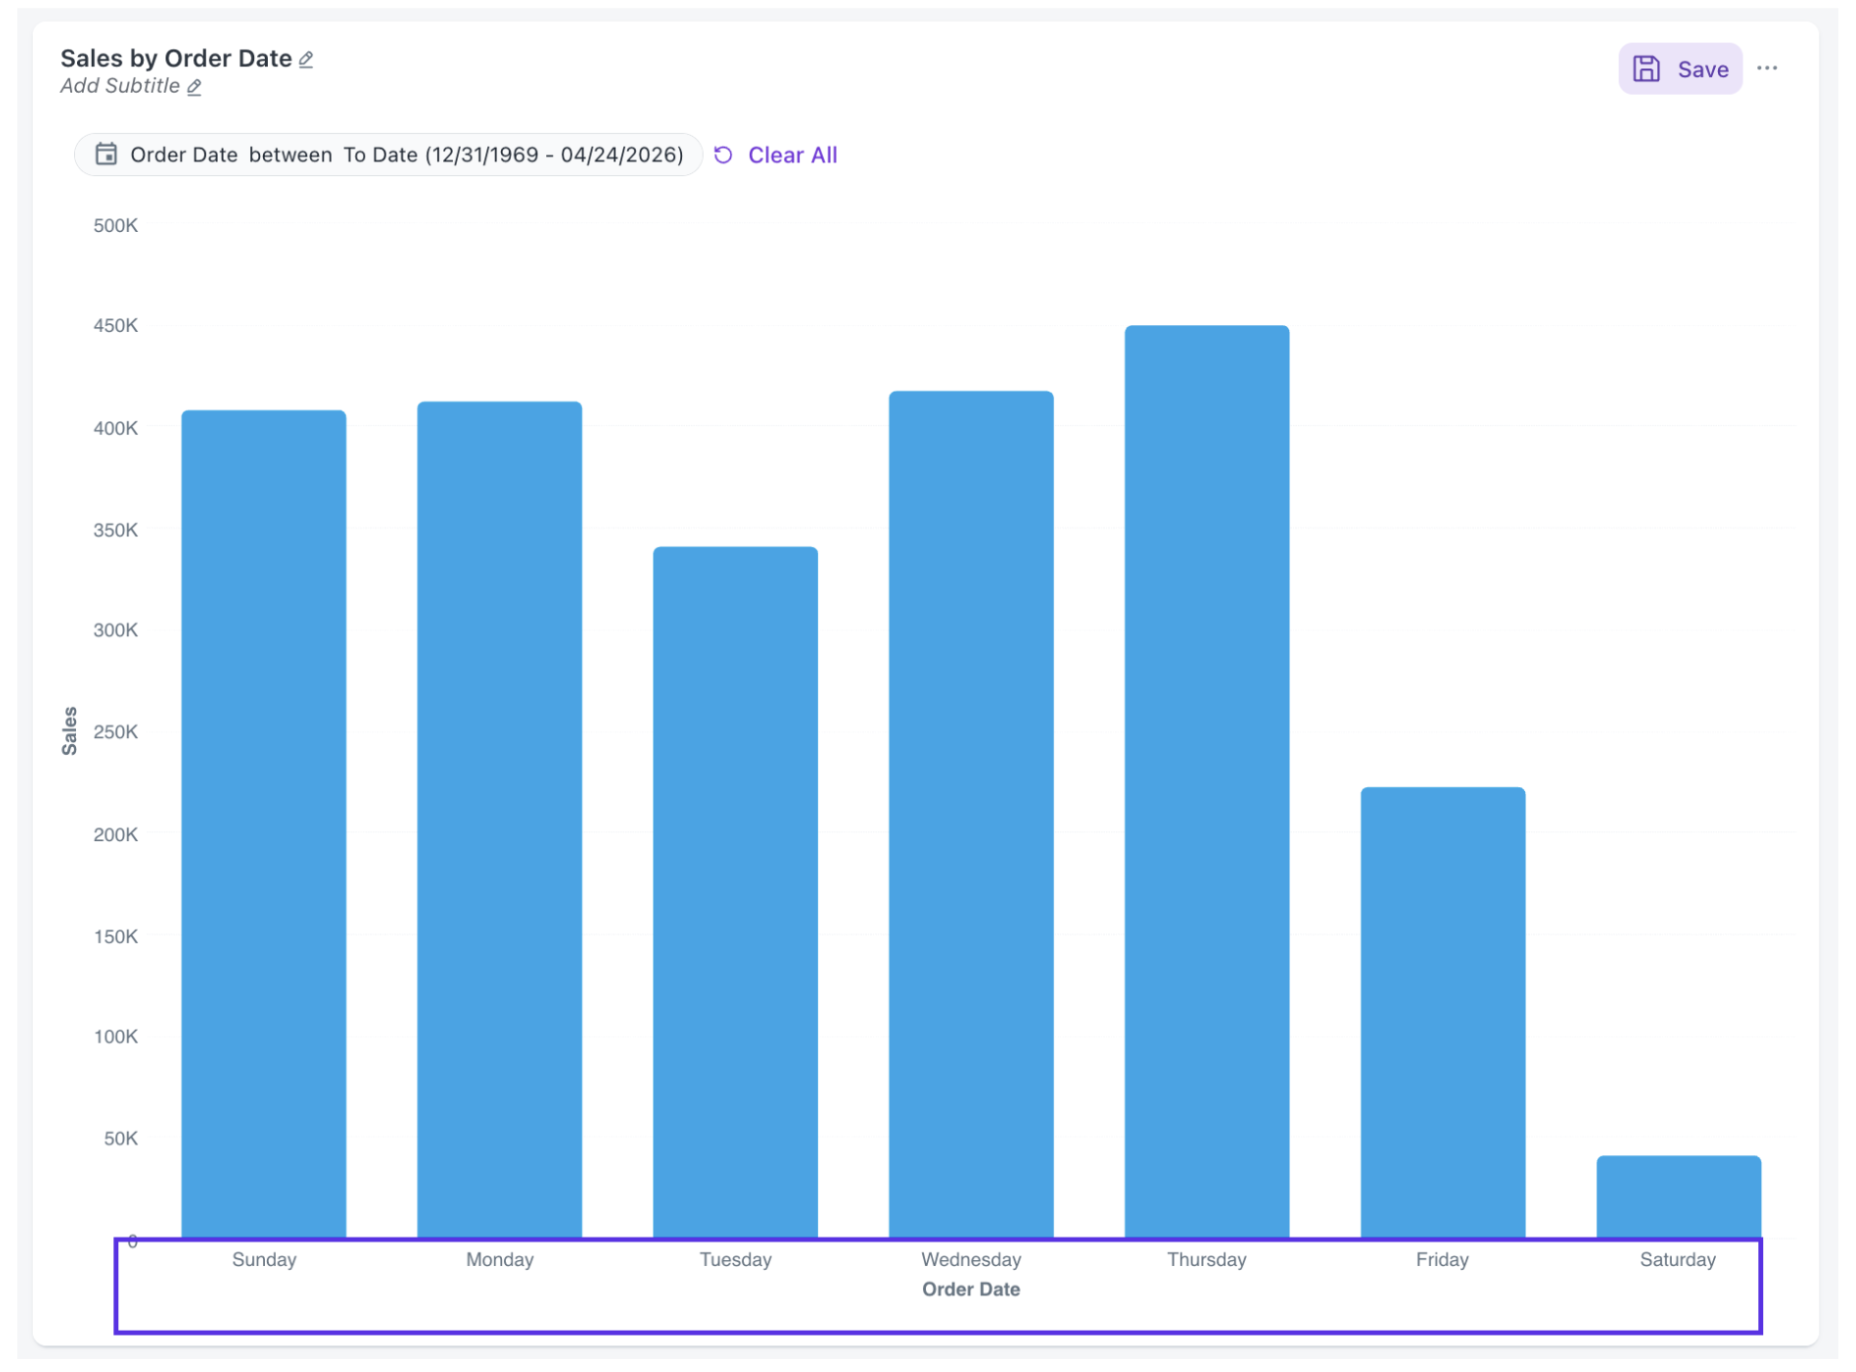
1.1 Before the Filter
By default, charts include all seven days. The example below shows Sales by Order Date across every day including weekends.
1.2 How to Enable
- Click the date filter chip at the top of your dashboard page.
- Locate the Exclude Weekends toggle in the date picker panel.
- Toggle it on. It turns blue/purple when active.
Optionally adjust your date range using the calendar or presets.
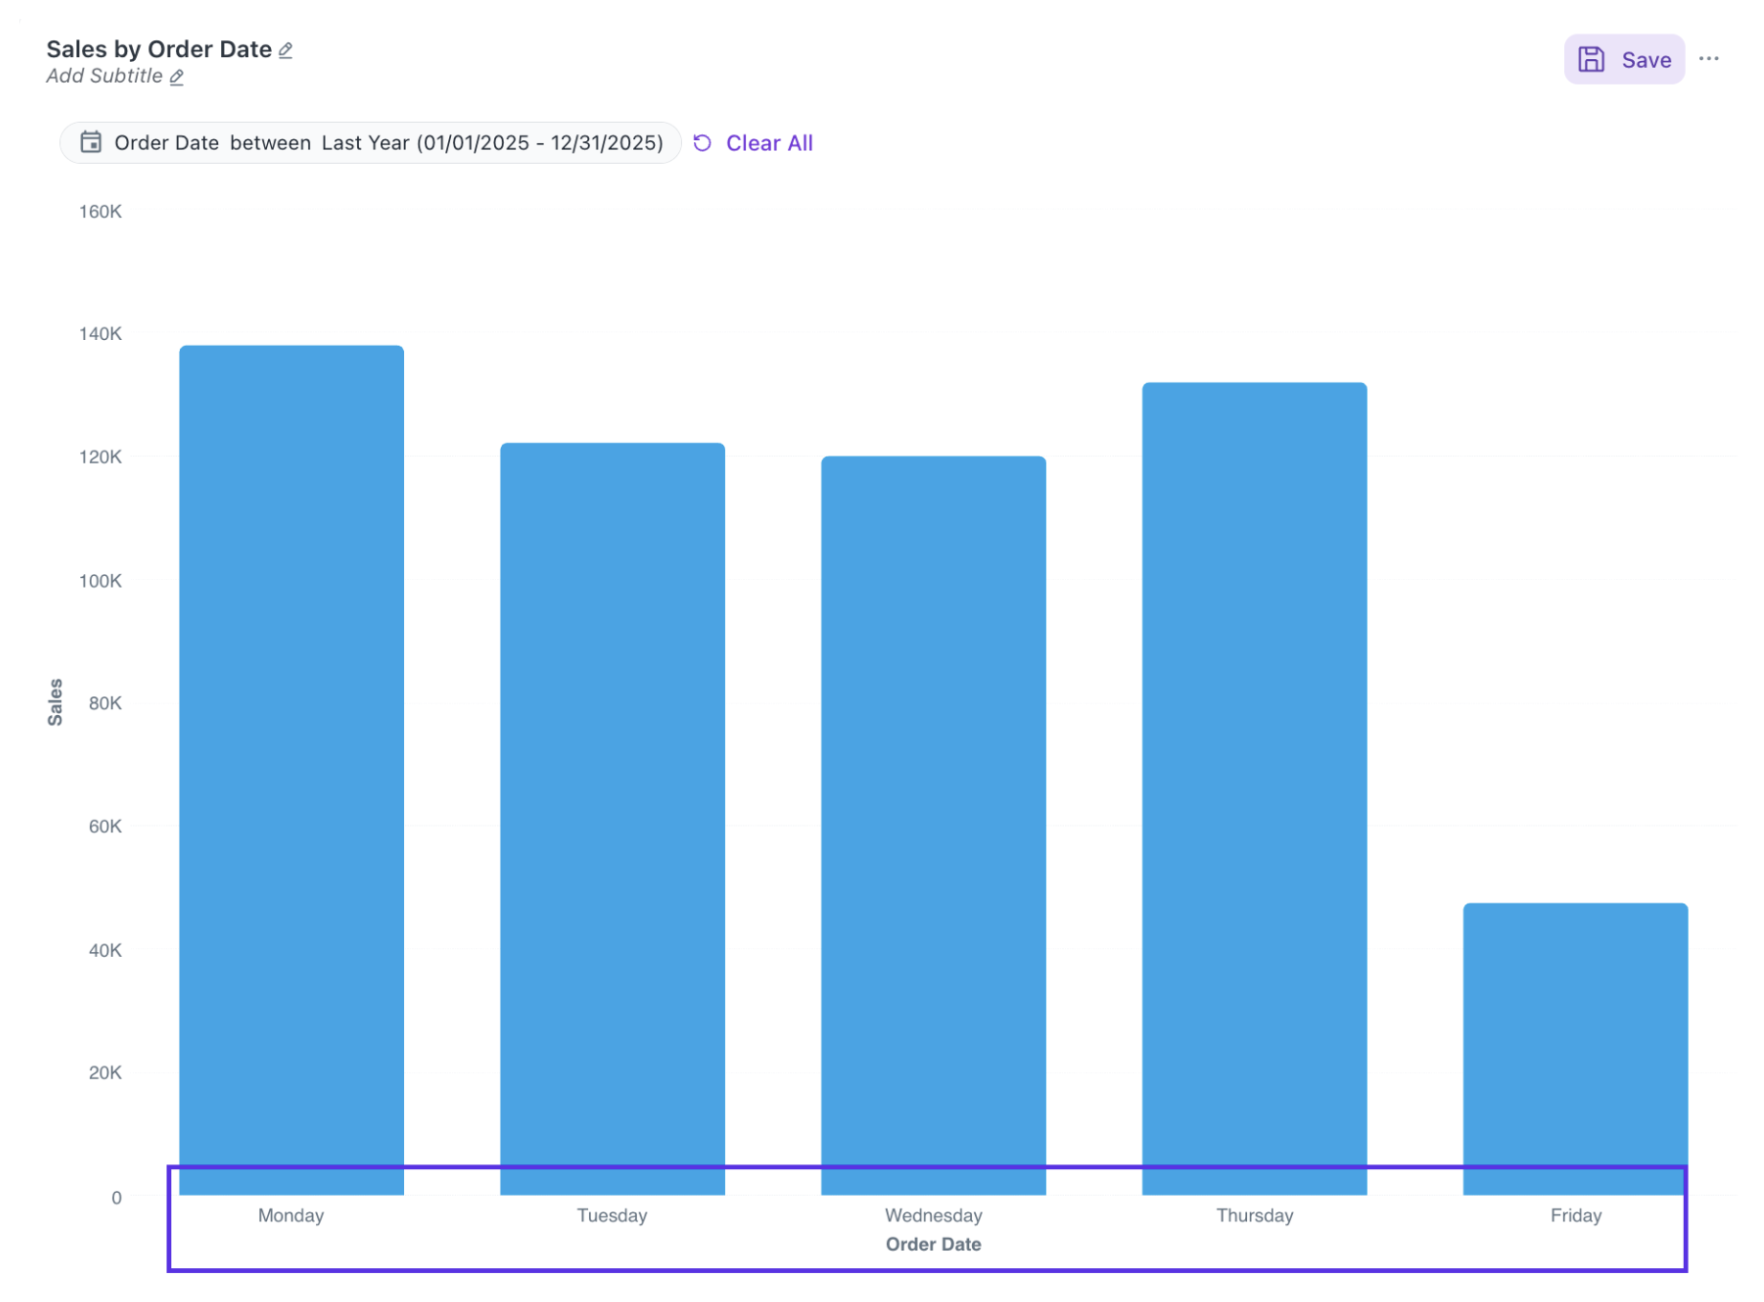
1.3 Result
The chart now shows only weekday data (Monday–Friday), giving a cleaner view of business-day performance.
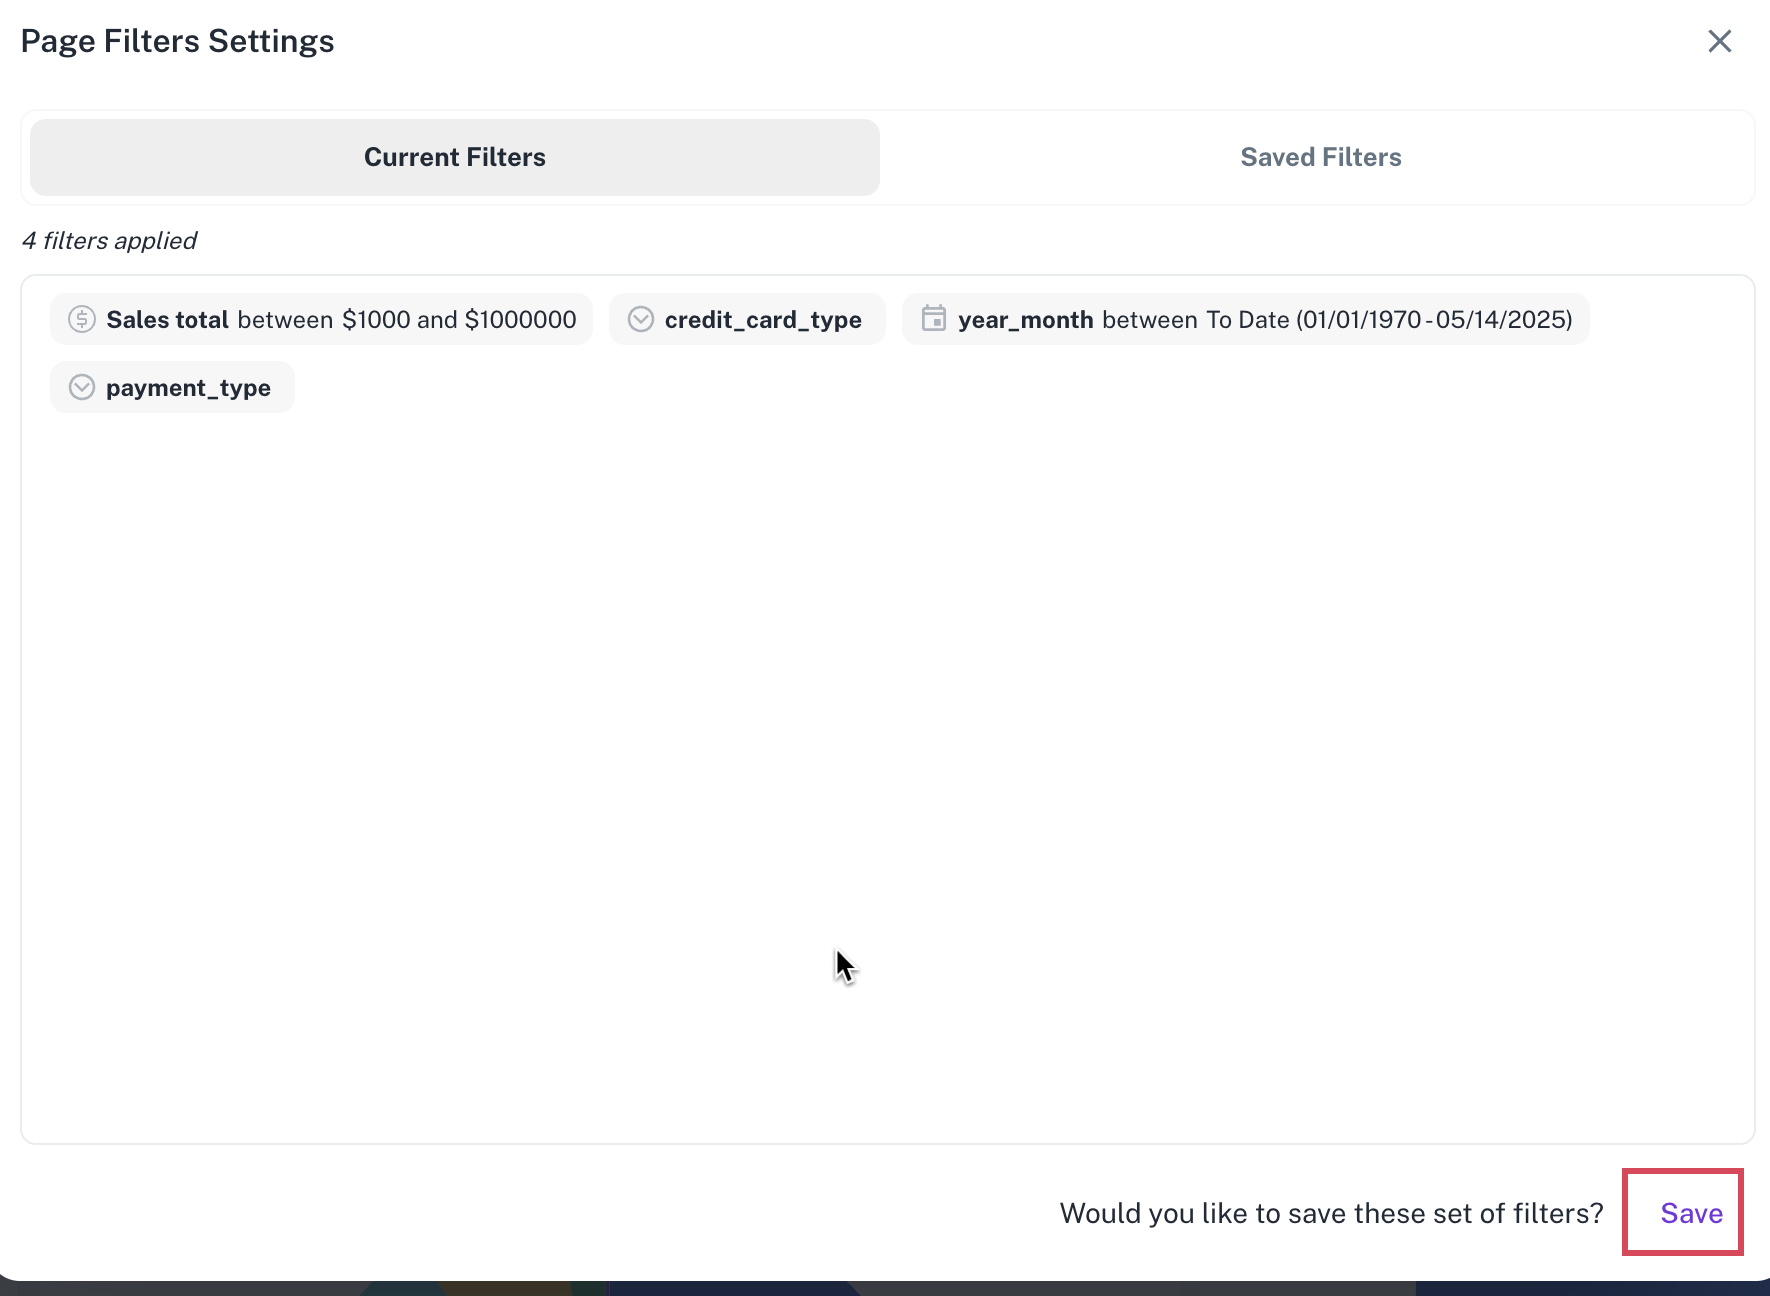
Saving a set of filters
When you have a specific combination of filters that you want to apply to your dashboard, you can save this as a filter set. This allows you to create multiple saved sets and easily apply them to your dashboard page at any time by simply selecting the desired set.
To save a set of page level/dashboard level filters, do the following:
-
From a workspace, access a dashboard.
-
On the dashboard, from the upper right corner, click the Settings icon, choose Manage filters and add page level/dashboard level filters.
-
From the upper right corner, click the filter settings icon.

-
In the Page Filter Settings box, in the Current filters tab, check the filters and click Save.
-
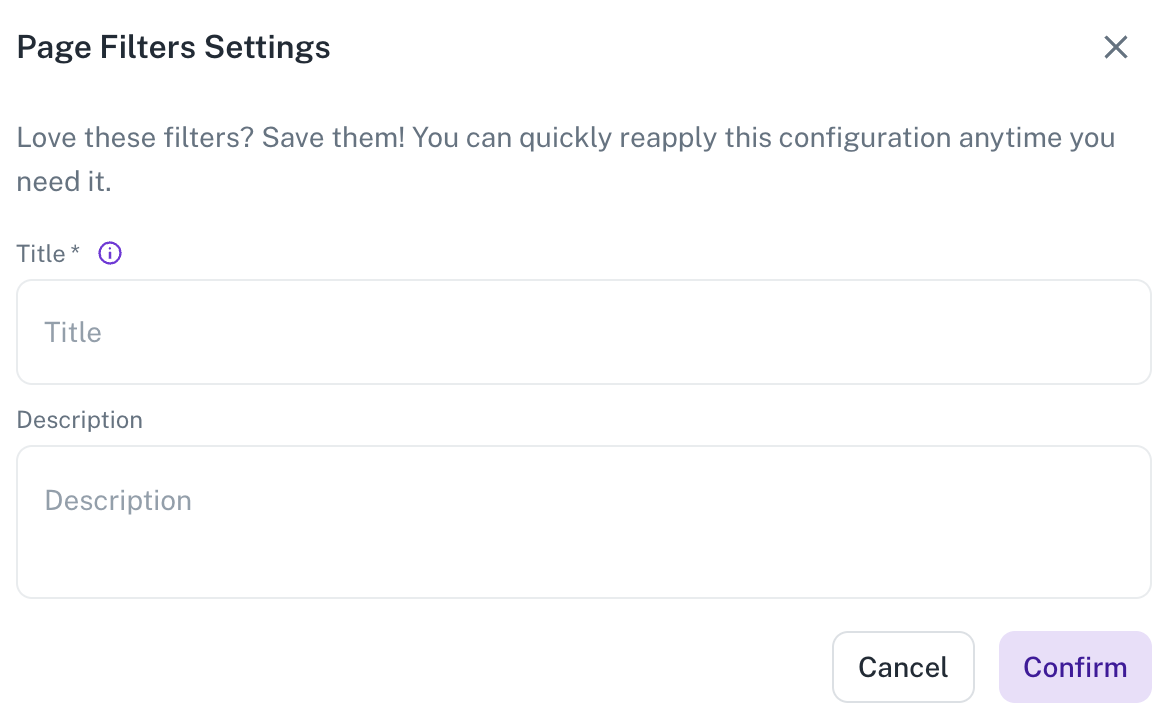
Add a title and description for the filters and click Confirm.
These filters are listed in the Saved filters tab.
Dashboard filters are specific to each user. If you select a set of filters, log out, and then log back in, your selections will remain unchanged. Your filter choices will also not affect other users.
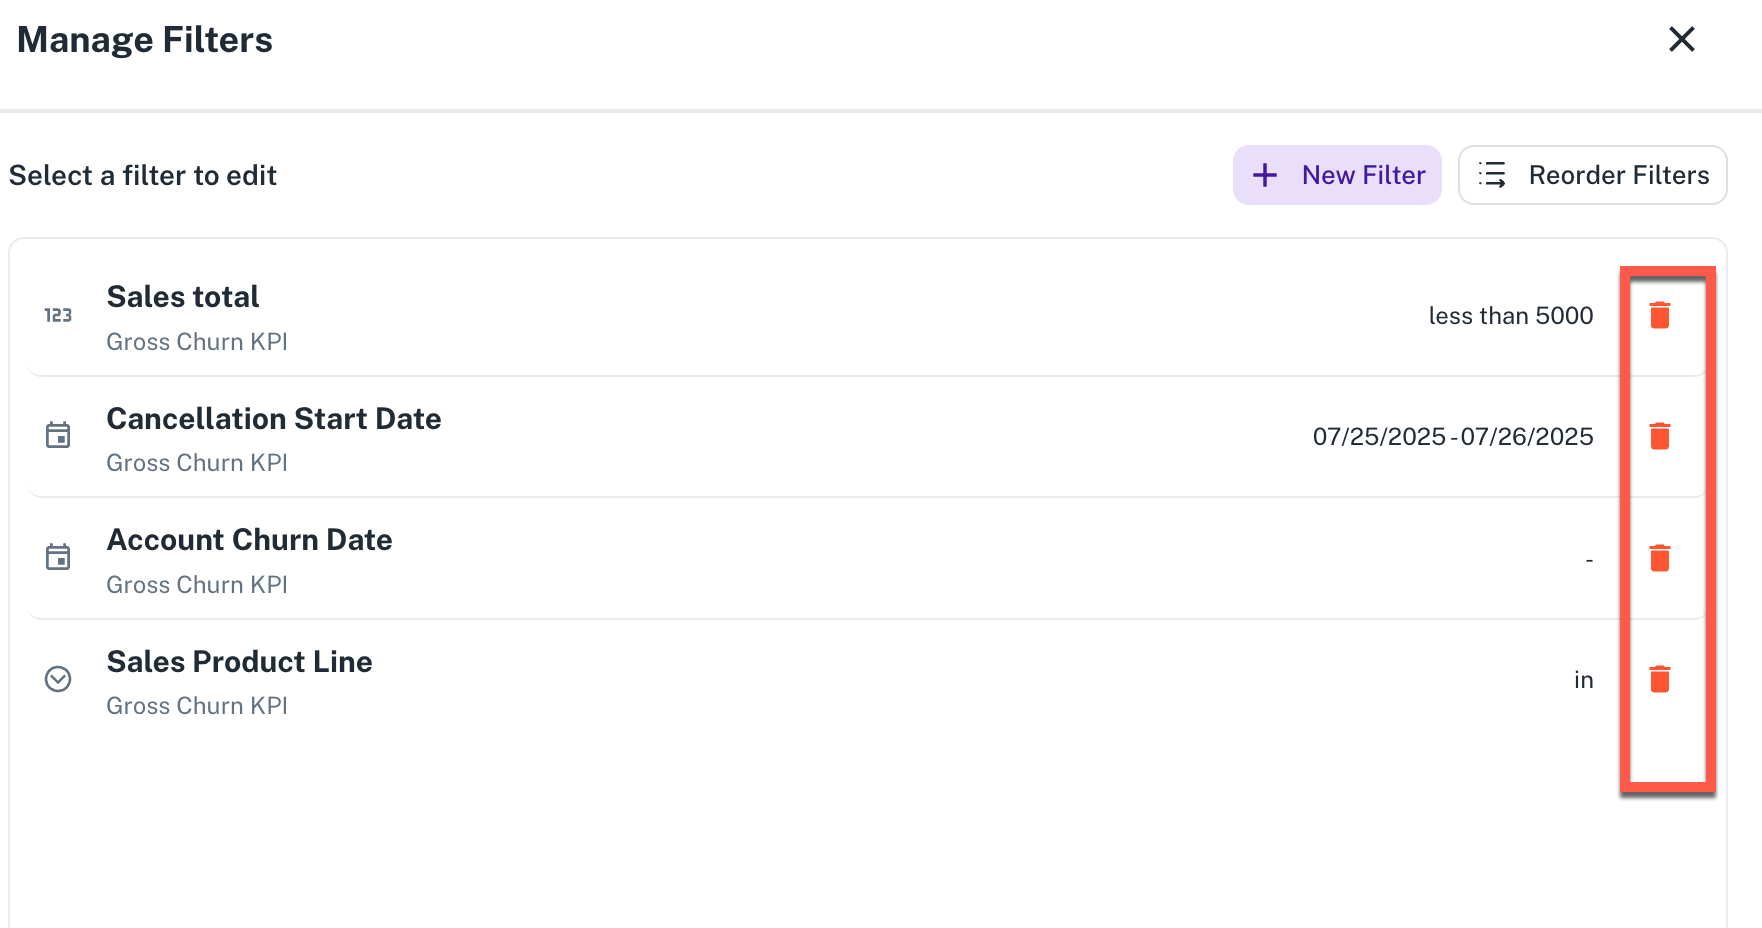
Deleting dashboard filter
-
On the dashboard, from the upper right corner, click the Settings icon, choose Manage filters and add page level/dashboard level filters. A delete icon is displayed next to each filter.
-
Click the delete icon and then click the Remove button to confirm.
Was this helpful?